Sunday, May 13, 2012

Zig-Zag Spring Hat Pattern


Here is my pattern, finally! It's ridiculously easy!  I saw a beret by Debbie Stoller (Stitch Nation) in Vogue Knitting.  I changed it by doing the first section as a k2tog instead of an ssk, but that's the only difference I made.  Unless you increase your stitches off the loom, or make wedges, it is difficult to make a beret, so it is just a toque. Sorry if I'm not very accurate; I really like to be flexible with patterns and therefore, I don't have any row numbers for hats. You can adjust if you want it to be a beanie (which is shorter).


41 or 40 peg loom (Knifty Knitter/ Michaels/ Wal-Mart brand does just fine)

Some people still have the 41-peg knifty knitter looms, but this pattern works best on any multiple of 4 (so you can also do it on a 36 peg loom).  For the 41 peg loom, the last peg should be purled.


Yarn size and gauge don't really matter, but I used Red Heart Super Saver Yarn and doubled it up.  You just need a fairly thick yarn (5 and up, or doubling up yarns) for the 41-peg loom. I broke the pattern down into 4 parts.

Stitches you need to know:

Knit (k) - normal stockinette stitch. Do not use e-wrap (twisted stockinette) stitch

Purl (p) - if you do not know how to do this stitch, please see this past post of Youtube compilations

Knit 2 together (k2tog) - In the pattern, for the first repeat of the ladder slanting to the right, your first k2tog occurs on peg 4.  To do this, take the loop off of peg 3, and then put it on top of peg 4. Yarn over peg 3 and knit together as 1 on peg 4.

Slip slip knit (ssk) - ssk - slip slip knit. This is weird in loom knitting because you don't have to do anything (whereas you have to slip the two stitches off the left needle, but I digress).  To make a ladder slant to the left, you take the loop off peg 3, and put it above the loop on peg 2, which will now have 2 stitches.  Knit those together as 1, and yarn over peg 3.

Yarn over (yo) - this is mentioned in combination with the k2tog and ssk. You do a yo before a k2tog. Basically bring the working yarn in front of the empty peg (because you moved the stitch to the next stitch for a k2tog) very loosely.  Do not e-wrap. You do a yarn over after the ssk has occu


PATTERN:

CO: 
Use whatever you like. I love the cable cast on for hats, because it looks like a thin line from afar and is stretchy. A long-tail cast on is a bit thick, but it also works nicely and is elastic.

Rib stitch
Row 1: *p2, k2
repeat row 1 until 1" is knitted

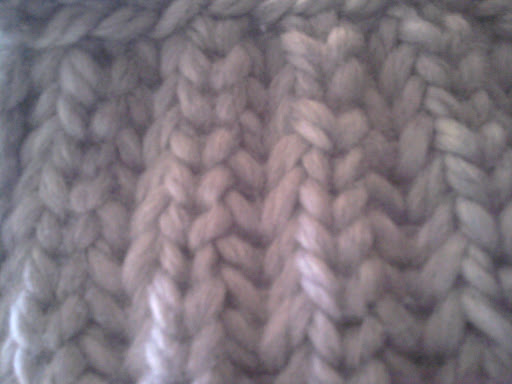
Ladder slant to the right
Row 1: *p1, k1, yo, k2tog, repeat *
Row 2: *p1, k3, repeat *
Repeat row 1 and 2 until you have knitted 4" for a beanie, or 4 1/2" for a regular hat

Ladder slant to the left
Row 1: *p1, ssk, yo, k1, repeat *
Row 2: *p1, k3, repeat *
Repeat row 1 and 2 until you have knitted 6" for a beanie (or even less, if you like them really short), or 6 1/2" for a regular hat

Decrease
Because the second half of the hat uses ssk I did a decrease using ssk instead of k2tog.  I didn't touch the purl stitches and only decreased on the knit stitches trying to maintain the pattern of the hat. After doing the amount wanted, bind off and weave in ends.

If you are having trouble, please read more.

Sunday, May 6, 2012

Weekend Youtube Roundup

Finally! I was supposed to finish this post two days ago, whoops! My excuse is that it was my birthday.  Anyways, most of these posts are new videos that go along with articles from loom knitters circle! These are great, especially Bethany Dailey's bind off/cast off comparison.

Today's videos will show you:

  • Chain lace stitch
  • Bind off / cast off comparison for loom knitting
  • slip one knit one pass over slipped stitch

Wednesday, May 2, 2012

Clever looms

No picture today, folks.  I know, it's sad.  I miss my digital camera too.

This is an old-timer, before high speed internet type of post.  If you are shocked, proceed to look at my past blog posts instead and enjoy.


Question: Have you built a loom before?
Answer: No, but I really want to build one.  You see, I live in Canada.  Okay, I will admit that living in Canada has nothing to do with anything.  I'm really lazy to find out if there are stores that I can go to buy finer gauge looms than a knifty knitter or any of its cousins.  It's on my summer bucket list.  Seeing that I'm making a small profit from knitting stuff for people, this is a very BIG possibility, because I want to be able to change my knitting gauge.  The knitting gauge depends on the space between your pegs.

Question:  Why would you want to make your own loom?
Answer: The main reason is because I do not have any change to spare.  Any money goes towards my education.  Also, I am curious.  I want to know how to build one.  My dad once built my mom a huge weaving loom just for her to make one afghan.  He won't be helping me, but I guess history has a case of repeating itself....except this is a knitting loom.  Save your money, folks! You can save so much money by making your own looms.  Most of the time you will have the materials, or you can go out and buy the materials for a fraction of the price.

Question:  Will you post your looms if you make them?
Answer: Of course I will. I will make them this summer for sure.  However, they may be really bad.  I've never been good at hands-on stuff except for knitting and painting.  I just can't think in 3D. But never say never! I have never been motivated to build stuff (especially for school projects; I just didn't understand why I needed to build the Globe Theatre while studying Shakespeare).  I honestly cannot tape popsicle stitcks together to make a fence in a model. It's that sad.  What I'm trying to say is, I'm here to encourage everyone to try it at least once!


I've found two very useful sites to build looms.

Adjustable looms/circular-looms/double-rakes:
This is the most CLEVER way to make looms I've ever seen in my life.  This is more like what I would do, because I am not that great with tools.  For a finer gauge loom, you need real rubber bands (for example, the ones for hair - they don't pull your hair out like the elastic bands you get with groceries), pick-up stitcks, and spacer beads.  I am so impressed.  She also has adjustable looms, which I think would be great for berets.  The only way I know how to make berets with knifty knitters are to increase stitches off of your loom or make wedges and sew them together.  This is a quick fix!  Increases or decreases will look neater, especially if you want to do a drastic decrease. As soon as I have enough money I'm going to go buy these items.  I think I can pick them all up at the local dollar store.

I also have to put out a blurb, because she does great Harry Potter stuff.  Honestly, that was the reason I learned how to knit.  Go Ravenclaw!

Standard wooden looms:
This is if you want to make looms similar to those found on knittingboard.com.  This is the standard double rake loom (as opposed to the newest all-n-one loom, which looks amazing and makes me salivate, if that is possible).  It's a rustic site, but it goes step by step.  I will probably be doing this when summer time actually hits (July).


Happy looming!  If you don't know how far you need to space your pegs check out loom knitting help here.

Tuesday, May 1, 2012

Brioche stitch revisited


There's nothing I like more than the brioche stitch.  It's nice and thick; so very sturdy.  I know I posted a video about the two-colour brioche stitch tutorial on youtube, but I wanted to show how the stitch would look with one colour.

It's not a very good picture, I know.  The digital camera is not with me for the moment, which disappoints me.

Anyways, its a very pretty stitch, and the video does a good job of explaining how to do the stitch.  You do the steps the same way as with 2 yarns, except you are repeating the second-half round with the same yarn.

Also, I was looking up more information about the brioche stitch and found this site which is dedicated to the stitch and its various forms.  Check it out! If you've done the stitch, trying the different variations should be easy.

UPDATE 04/12/13: I have added a tutorial that will hopefully help you work brioche here